In June 2023, approximately 90,000 mobile apps were introduced on the Google Play Store, while another 36,000 debuted on the Apple App Store. Impressive numbers, right?
The catch is, how many of these apps actually achieve significant success? Brace yourself because it's a dismal 0.01%. Shocking, isn't it?
Now, you might be pondering, "What's preventing the other 99.99% of mobile apps from realizing their dreams?" Is it funding or business model issues? Not quite. The likely cause is the development bug!
Yes, investment and business strategy play a role, but the crux of the matter lies in design. Neglecting crucial design processes like prototyping, a refining phase in early product development, can be the downfall. The result? It can save you a lot of time and significantly improve your chances of success.
So, when it comes to crafting a prototype for your mobile app, does it seem complex? Don't worry; we're here to simplify the process and assist you in designing a successful mobile app prototype.
It’s possible to create a mobile app prototype successfully in six steps. So, here are the steps according to logical order to do this.
Before getting into problem-solving, it's crucial to first identify the problem. So, whether you're designing the main product or a prototype of your product, the first step is to define your problem concretely.
For example, imagine you're convinced that existing ride-sharing services in your city don't provide efficient transportation options for commuters. Your objective here is to create a superior alternative. To achieve this, you'll need to start by identifying the shortcomings of current ride-sharing systems.
Afterward, it's crucial to dig into your potential users' specific needs and preferences. You might want to gather data on what commuters desire in a transportation service, such as affordability, safety, and reliability. This insight will serve as the foundation for creating a feature set that addresses these requirements.
Prototyping is all about putting your app's core functionalities to the test. Your initial task is to identify what these core functionalities are. This first section is similar to preparing the groundwork for crafting an effective prototype. It's crucial to pinpoint the most vital features to showcase in the prototype.
This step is important because the whole point of a prototype is to make a quick mock-up of your app that can be tested. It will take longer to implement dozens of features if you have a large number of them. Not to mention that it can overwhelm or confuse users, resulting in inaccurate insights.
We understand that selecting which features to include in your prototype isn't simple. Every feature, even the smallest ones, can feel important, right?
In this case, brainstorm more, establish a hierarchy, and select the most relevant ideas for your target demographic. If you find it hard to choose between two or more comparable features, it might be beneficial to construct multiple prototypes. Use A/B testing to find the one that users connect with the most strongly.
Once you've identified your app's core features, start by creating a low-fidelity paper prototype. This initial sketch outlines your app's goals without diving into intricate details, acknowledging that apps often evolve from their original concepts. Think of it as the starting point for your design and development journey.
This paper prototype, also known as a low-fidelity wireframe, should depict the main app screens, featuring the basic layout and intended user interface elements. Use arrows or a card sorting method to illustrate user navigation between screens.
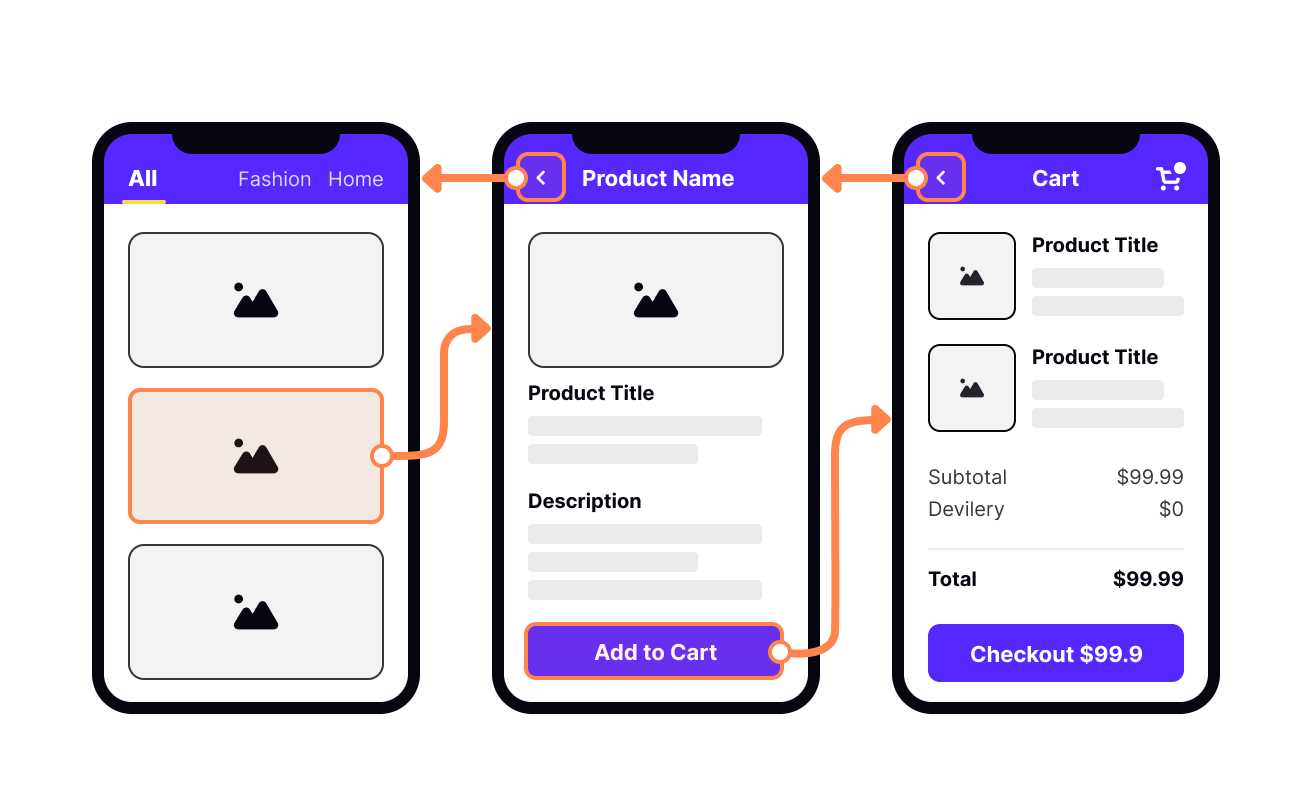
For example, if you're prototyping an e-commerce app, draft a rough layout for the product screen, including placeholders for product images and buttons like "Checkout." Then, draw an arrow from the "Checkout" button to the checkout screen to demonstrate the user's interaction flow. Avoid spending too much time on visual aesthetics at this stage.

Since low-fidelity prototypes don't require much detail, going all out on aesthetics would be counterproductive. The main goal is to explain the layout and screen flow of the app. You can test and validate early concepts with paper prototypes. You can make this lightweight prototype quickly and use it to verify your ideas.
For a more in-depth understanding of when to use high or low fidelity, I recommend reading the article "Hi-fidelity prototype or low fidelity; which one should you choose?" When you're satisfied with your sketch, it's time to transform it into a more polished prototype.
Once you've sketched out your initial ideas on paper, the next step involves creating digital wireframes using a wireframing tool. Here's a detailed guide on how to wireframe a mobile app design:
Choose a Wireframing Tool: First, select a wireframing tool that suits your needs. You'll find various free and paid options, such as Sketch, Adobe XD, Figma, Balsamiq, and more. Pick one that you're comfortable with or are willing to learn.
Create a New Project: Start with a new project within your chosen wireframing tool. Define the device dimensions (e.g., iPhone 13, Android) to ensure your wireframe is appropriate to the target platform.
Define the Basic Layout: Start by placing basic components on your canvas to represent the essential elements of your app. These components include headers, navigation bars, content areas, and footers. Ensure that you establish a consistent layout grid and spacing system.
Navigation Structure: Plan and depict the app's navigation structure. Use arrows or lines to indicate how users move from one screen to another. Create buttons or links representing navigation items such as menus, tabs, and buttons.
Content Placement: Populate the wireframes with placeholder content. This can include text, images, and icons. Make sure to label each element with clear descriptions. Placeholder content helps stakeholders understand the purpose of each screen.
Functional Elements: Add interactive elements like buttons, checkboxes, input fields, and dropdown menus. Indicate how they should behave when clicked or interacted with. These interactions provide a sense of the app's functionality.
Annotations and Descriptions: Include annotations or descriptions for key elements or interactions. Explain how certain features work, provide context, and specify any user interactions or transitions.
User Flow Diagrams: Create user flow diagrams or user journey maps to illustrate how users will navigate through your app. Connect wireframes with arrows to show the logical progression of screens.
Feedback and Collaboration: Share your wireframes with team members, stakeholders, or potential users to gather feedback. Most wireframing tools offer collaboration features that allow for comments and annotations, making it easier to refine your design.
Iterate and Refine: Based on feedback, iterate on your wireframes. Make revisions to improve usability, user experience, and overall design clarity. Repeat this process until you have a solid foundation for your mobile app.

Once the wireframe has been tested and approved, the next step is transforming it into a final mobile app design prototype. This phase involves infusing the wireframe with color, typography, and various visual elements to bring it to life and closely resemble the envisioned final product.
To achieve this, you must select a palette of colors, fonts, and other design elements that align with your app's branding and user interface guidelines. Once the visual elements are in place, it's time to create a prototype that mimics the actual user experience of the app.
Several prototyping tools are available, such as InvisionApp and Xcode, which facilitate the creation of interactive prototypes. These tools allow you to simulate user interactions, transitions, and functionality using fake data and placeholder content.
This prototype is crucial in testing the app's usability and functionality before moving on to the development stage, ensuring a smoother and more user-friendly final product.
Once your prototype is ready, it’s time to preview and share your app with your team, stakeholders, and users. To do this, you need to cover the following aspects.
This is an excellent opportunity to obtain much-needed feedback. Begin by conducting usability testing. Include more than just members of the development team. Share it with HR, accounting, and marketing personnel. However, the most important group to test it with is your app's end users.
After gathering significant feedback, you will refine your prototype to address pain points and issues with your app. However, iterating once will not solve all of the problems; you must continue to iterate.
Your stakeholders are mainly your upper management, clients, or investors. On the other hand, rather than only showing off your work, you should be getting ready to give a presentation because there may be a lot of debate and questions about your choices.
For example, if an investor questions your design choices, always show data proving that users preferred it over everything else to make it appear profitable. It is worthwhile at this point to refine your prototype and make it more attractive to stakeholders.
In the past, prototyping was considered a voluntary stage of the development process. It is now considered a necessary component for the success of an app. The process can provide real-world insights that are difficult to find through planning and presumptions alone.
These insights can be very useful. When combined with an exhaustive testing regimen, prototyping ensures that your application lives up to the standards set by users and clients.
We hope this post has motivated you to incorporate prototyping into your upcoming projects. Or, if you require additional assistance and guidance, why don't you contact us? We would be happy to serve you!
AA mobile app prototype is a functional mock-up of a mobile app that simulates design features and enables stakeholders to review the look and feel of possible versions. It is a way of creating a simulation of an app that shows how it will look and function without writing any code. Prototypes are interactive and show the app's behavior, functionality, and feedback, which helps test user experience interaction and gain feedback from users and stakeholders. Creating a mobile app prototype can help pitch to investors, learn more about the strengths of the app idea, and avoid wasted resources, time, and effort in the long term.
A UI prototype showcases a product's design and functionality to stakeholders, clients, and potential users. During the design and development process, it allows you to visualize how users will interact with your product, website, or application.
UX (User Experience) and UI (User Interface) prototyping are distinct processes in digital product design. UX prototyping creates a user-friendly experience through wireframes, testing, and high-fidelity prototypes. UI prototyping enhances visuals by converting wireframes to mockups, creating interactive prototypes, and collaborating with developers. Both are crucial for successful digital products, with UX focusing on functionality and UI on aesthetics and interaction. Designers often collaborate closely during the entire process.


An Experience Design Agency focusing on building functional, simple, human-centered digital products for future.