Prototyping is important because it helps visualize ideas, test functionality, and identify potential issues early in development. It reduces risks, saves time and resources, and secures the final product that effectively meets user needs. But what is prototyping exactly?
Well, prototyping is creating an early sample, model, or product mockup to test concepts and gather feedback. It allows designers to explore ideas, refine functionality, and ensure the final product meets user expectations.
Ultimately, prototyping is where imagination meets reality. It's the blueprint of a design that lets it refine, adapt, and perfect. Let's go without further ado!
In design, a prototype is an early, interactive model of a product, system, or concept, used to test ideas, explore functionality, and gather user feedback before final development, ranging from simple paper sketches (low-fidelity) to nearly finished digital versions (high-fidelity). It's a crucial tool for making abstract ideas tangible, allowing designers to quickly experiment, identify flaws, and refine solutions, saving time and resources in the long run.
They're used to gather feedback, identify problems, and refine solutions. Think of it as a way to bring your ideas to life and see them in action. Prototyping saves time, reduces risks, and helps ensure the final design meets user needs effectively and creatively.
Prototyping in design is the experimental process of creating early, simplified models (prototypes) of a product or idea to test, visualize, and gather feedback before building the final version, helping teams quickly identify flaws, refine concepts, and save time and money by iterating rapidly. These prototypes can range from low-fidelity (like paper sketches) to high-fidelity (interactive digital mockups) and are crucial for making abstract ideas concrete and ensuring the final product meets user needs effectively.
Each type of prototype serves specific needs and plays a unique role in the process. Here are eight major types of prototypes explained in an engaging and structured way, to ensure clarity and variation for every type.
When teams need to explore concepts and layouts quickly, low-fidelity prototypes become the go-to solution. These simple, rough design versions are often created using paper, sticky notes, or basic wireframes. Rather than intricate details, they focus on the overall concept, layout, and structure.
Teams can quickly share these prototypes with stakeholders and gather feedback. Since they are inexpensive and easy to create, they're perfect for brainstorming sessions. Feedback from low-fidelity prototypes helps refine the design before moving into detailed stages.
For a design that closely mirrors the final product, high-fidelity prototypes step in. These are detailed models that look and feel like the finished version. They include polished visuals, realistic interfaces, and interactive features, making it easy to test how the product will work in real life.
These prototypes are perfect for getting feedback on navigation, functionality, and the overall user experience. Often, they're shown to stakeholders to get approval before moving forward with development.
High-fidelity prototype takes more time and effort, it offers incredible value by showing exactly how the end product will perform. They're the key to ensuring your design meets client and user expectations.
To assess whether an idea is technically achievable, feasibility prototypes are used. They focus on testing the performance of specific features or systems within the design. Commonly seen in engineering and software development, this type of prototype helps teams understand potential technical limitations.
Addressing these challenges early saves time and resources in the later stages of development. Feasibility prototypes ensure that designs are practical and aligned with the available technology, preventing costly setbacks.
Capturing ideas in their simplest form often begins with sketches and diagrams. These quick, visual tools are used during brainstorming sessions to map basic structures or flows. While simple, they're highly effective for collaboration and idea-sharing among teams. They require minimal resources, just paper or digital tools and can be adjusted easily during discussions.
Even though they don't include physical or interactive elements, they are the foundation for more refined prototypes. Sketches and diagrams are perfect for capturing the essence of an idea without overcomplicating it.
When it's time to turn ideas into tangible forms quickly, rapid models created through 3D printing lead the way. These physical prototypes let designers test a product's form, fit, and function in real-time. Industries like product design and architecture often rely on rapid models to evaluate designs and identify potential flaws.
Unlike traditional prototyping methods, 3D printing allows quick iterations, saving time and resources. By physically interacting with these models, teams gain deeper insights and create accurate, functional designs ready for production.
Physical models bring designs to life for testing real-world usability and ergonomics. These hands-on prototypes are made from clay, foam, or plastic and provide a direct product experience. Unlike digital representations, physical models allow users to evaluate size, feel, and fit, making them crucial in automotive design or furniture manufacturing.
They help uncover issues that might not be obvious in digital prototypes, ensuring designs meet practical expectations. Physical models are an interactive way to refine a product before moving forward.
Leveraging the latest technology, virtual and augmented reality prototypes offer immersive experiences of designs. These simulations let users explore and interact with a product in a virtual environment. Ideal for testing layouts, user interactions, and large-scale systems, VR/AR prototypes have become popular in fields like gaming, architecture, and healthcare.
They allow teams to gather feedback without creating physical models, streamlining the design process. By using VR or AR, teams can test different scenarios, make real-time adjustments, and refine their ideas efficiently.
At the final stages of testing, working models bring both form and function together to demonstrate how a product will operate in real life. These prototypes ensure that usability, performance, and reliability are thoroughly evaluated under actual conditions. Using a working model, teams can confirm that the product meets its goals and address any last-minute issues before production begins.
Stakeholders benefit from seeing a tangible, operational prototype, which helps them understand the design's potential impact. This validation process minimizes risks and guarantees that the final product delivers as expected.

Understanding the differences between low-fidelity and high-fidelity prototypes can help you choose the right approach at the right time. Both serve unique purposes and bring value to the table, but their focus, complexity, and outcomes differ significantly.
Low-fidelity prototypes are the starting point for any design. They are quick, simple, and inexpensive representations of your concept. These could be basic sketches, wireframes, or digital mockups focusing on the overall structure and functionality rather than fine details.
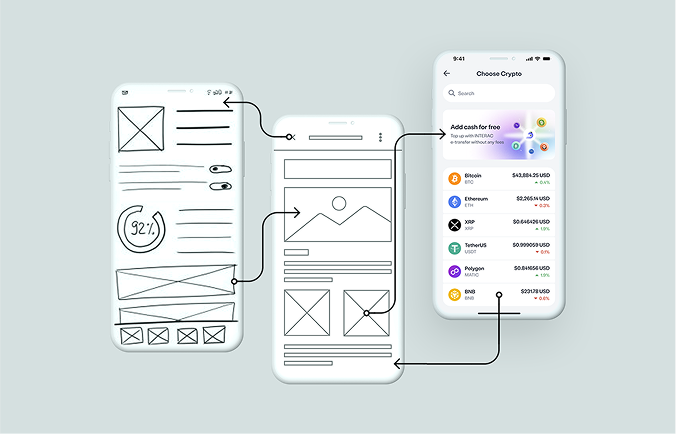
For example, imagine you're designing a new app for restaurant reservations. A low-fidelity prototype might be a set of hand-drawn screens showing the home page, a search bar, and a simple flow from selecting a restaurant to confirming a booking. This helps you communicate your ideas to stakeholders or teammates without wasting time on aesthetics.
These prototypes are particularly useful for:
Low-fidelity prototypes excel in flexibility and speed and limited in functionality. They cannot effectively simulate user interactions, making them unsuitable for detailed testing.
High-fidelity prototypes come into play when the focus shifts from ideation to usability and refinement. These are interactive, polished models that closely resemble the final product. They feature realistic visuals, animations, and functional elements that mimic the user experience.
For instance, if you're creating an e-commerce website, a high-fidelity prototype might include a clickable product catalog, a shopping cart with dynamic updates, and transitions that simulate real-time interactions.
This level of detail enables you to:
The downside of high-fidelity prototypes is the time and resources required to build them. Tools like Figma, Adobe XD, or even custom code might be necessary to achieve the desired level of detail, making them more labor-intensive.
Both low-fidelity and high-fidelity prototypes are invaluable in their ways. While low-fidelity prototypes give you the freedom to iterate and refine ideas quickly, high-fidelity prototypes provide the depth needed to validate functionality and user experience. Knowing when to use each ensures that your design evolves efficiently and resonates with users.
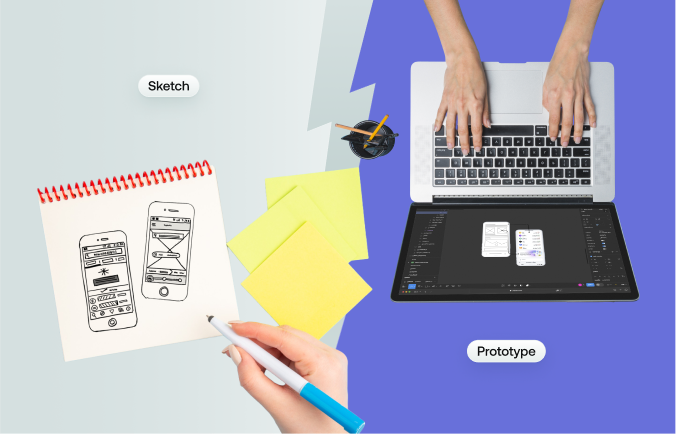
Prototyping and sketching are distinct stages in the design process, each serving a unique purpose.
Sketching is a quick and straightforward way to visualize ideas, often using paper or essential tools. It focuses on capturing initial concepts, layouts, or structures without diving into details.
Prototyping, on the other hand, takes these ideas further by creating more advanced models that can be interactive or functional.
The main difference lies in their purpose and detail level. Sketching is used for brainstorming and exploring possibilities, and prototyping is about testing and validating specific aspects like usability, navigation, or technical feasibility.
Sketching remains static and non-interactive, providing an essential visual representation, whereas prototyping often allows for interactivity, enabling users to experience and test the design.
The tools involved also differ. Sketching typically uses simple resources like pen, paper, or a whiteboard, while prototyping relies on specialized software like Figma or Adobe XD or even physical tools like 3D printers for tangible models.
In essence, sketching captures raw ideas, and prototyping refines those ideas into testable and practical solutions, making both essential steps in a well-rounded design process.

Prototyping is a cornerstone in UI/UX design, offering many advantages that streamline the design process and enhance the final product's quality. Here are seven key benefits of incorporating prototyping into your UI/UX workflow:
Prototyping allows designers to create tangible models of their concepts, enabling the identification and rectification of design issues at an early stage. By simulating user interactions, prototypes reveal usability problems that are not apparent in static designs. Addressing these issues early reduces the risk of costly revisions post-development.
Prototypes serve as practical communication tools between designers, developers, and stakeholders. They visually represent the product, facilitating clearer discussions and feedback. This shared understanding ensures that all parties are aligned, reducing misunderstandings and streamlining decision-making processes.
By identifying and resolving potential issues during the prototyping phase, teams can avoid expensive changes during development. Prototyping enables testing different ideas and concepts in various forms, allowing for adjustments before significant resources are invested. This proactive approach leads to a more efficient workflow and optimal resource utilization.
Engaging users with prototypes provides valuable insights into their needs and preferences. By observing how users interact with a prototype, designers can gather feedback to refine the product, ensuring it resonates with the target audience. This user-centered approach leads to products that offer intuitive and enjoyable experiences, fostering higher user satisfaction and loyalty.
Prototypes enable usability testing by allowing users to interact with a working product model. This interaction helps uncover usability issues and understand user behavior, providing a solid foundation for making informed design decisions. Conducting usability tests on prototypes ensures that the final product is user-friendly and meets user expectations.
With a well-defined prototype, developers receive a clear blueprint of the product's functionality and design. This clarity reduces ambiguities and the likelihood of rework, leading to a smoother development phase. Prototypes are a reference point, ensuring the development team accurately translates the design into a functional product.
Presenting a tangible prototype to stakeholders allows them to experience the product firsthand, increasing their confidence in the project's direction. This experiential insight can lead to more substantial support and commitment from stakeholders, as they can see their feedback and requirements materialize effectively.
Prototyping in UI/UX design is a creative process that brings your ideas to life, transforming abstract concepts into tangible and testable solutions. It bridges the gap between imagination and reality, ensuring your designs resonate with user needs and expectations. Let's explore the detailed stages of prototyping step by step.
Every great project begins with a clear purpose. Start by defining the goals of your prototype. Ask yourself:
This stage is about narrowing your focus. For instance, if you're designing a new e-commerce app, decide whether to test the checkout process, product navigation, or user onboarding experience. Having a defined objective ensures that your prototype serves its purpose effectively without unnecessary complexity.
Research fuels creativity and relevance. Dive deep into your target audience's behavior, preferences, and pain points. Conduct surveys, interviews, and competitor analysis to gather actionable insights.
For example, if your project involves creating a mobile app for fitness enthusiasts, study their daily routines, challenges in tracking workouts, and the features they value most. Proper research will serve as a foundation for your design, ensuring your prototype aligns with user expectations.
Before diving into connections, ensure all your Frames have distinct and descriptive names. This step simplifies navigation, especially in larger projects. Rename Frames by double-clicking the labels in the Layers panel or the top-left corner of each Frame. Clear names like “Login Screen” or “Photo Stream” make managing prototypes easier and avoid confusion.
Decide where your user journey begins. Select the starting Frame, such as the login screen, and mark it as the “Flow Starting Point” in your prototyping tool. This establishes the prototype's entry point, guiding users naturally into the experience.
Prototyping shines when interactivity is introduced. Begin by linking elements within a Frame to other Frames. For example, connect a “Sign In” button to the “Home Screen” by dragging the interaction handle from the button to the target Frame. Adjust interaction settings like transitions and animations to fine-tune the experience.
Design smooth navigation for users by linking buttons, icons, or clickable elements to their respective Frames. Incorporate essential flows, such as a “Back” button to return to the previous page or a “Profile” button to navigate to a user's profile screen. These fundamental interactions help users understand the app’s structure and functionality.
Expand the prototype by creating extra Frames to simulate real-world usage. For instance, add a “Profile” page with the user’s details, photos, and buttons for settings or logout. Duplicate existing Frames for consistency and modify content as needed. Make sure all connections are updated to avoid linking errors.
Testing is where your prototype's value becomes evident. Launch the prototype in “Present” mode to simulate user interactions. Check that all connections work seamlessly, and pay attention to the flow, transitions, and overall user experience. Use tools like Figma's device preview mode to visualize how the prototype appears on different screens.
Invite stakeholders or users to test the prototype. Share a link to the prototype and observe how they interact with it. Note any confusion, missed interactions, or feedback for improvement. Based on these insights, refine the prototype to improve usability and address gaps.
Once testing and revisions are complete, prepare the prototype for sharing. Use tools to provide developers with detailed specs and ensure smooth collaboration. In the handoff process, highlight transitions, animations, and interactions clearly. Share the final prototype with stakeholders or team members to align everyone on the project's vision.
Showcasing prototypes effectively in your portfolio can set you apart as a designer. Here are some key strategies for making your prototypes stand out while maintaining a professional touch.
Not all prototypes belong in your portfolio. Focus on projects highlighting your problem-solving abilities, creativity, and technical expertise. Whether it's a low-fidelity wireframe that outlines a complex user flow or a high-fidelity interactive design, ensure the prototypes you showcase align with the type of work you want to pursue.
Every prototype should have a narrative. Explain the problem you were solving, the users you designed for, and the process you followed to arrive at the solution. You provide context that resonates with potential clients or employers by including details about research, iterations, and challenges overcome.
Use your portfolio to emphasize the most critical aspects of your prototypes. Annotate screenshots or embed interactive links to guide viewers through the user journey. Identify unique interactions, creative design decisions, or technical complexities demonstrating your skills and thought process.
Diversity in your prototypes can make your portfolio more engaging. Showcase a range of low-fidelity sketches, wireframes, and fully interactive high-fidelity designs. This variety reveals your versatility as a designer and your ability to contribute at different stages of the design process.
Static images alone won't do justice to your prototypes. Where possible, embed videos or interactive links that allow viewers to experience your designs firsthand. Use mockups to frame your prototypes within realistic contexts, such as mobile screens or desktop environments.
While details matter, too much information can overwhelm. Strike a balance by including concise descriptions supplemented with visuals or videos. Let the prototype's functionality speak for itself and provide enough background to support its significance.
Before finalizing your portfolio, get feedback from peers, mentors, or industry professionals. Their input can help refine your presentation and ensure your prototypes leave a strong impression. Iterating on how you showcase your work is as important as iterating on the designs themselves.

A great prototype bridges the gap between concept and reality, encapsulating the essence of the final product. To ensure its effectiveness, a prototype must exhibit several key qualities:
An impactful prototype should mimic the final design's appearance, functionality, and user experience. It doesn't require every feature to be fully developed but its visual and functional aspects should offer stakeholders and users a clear preview of what to expect. This realism fosters understanding and aids in decision-making.
The level of detail in a prototype plays a significant role in its success. High-fidelity prototypes—those that are polished, detailed, and visually realistic—elicit more constructive feedback. By providing clarity through well-designed elements, prototypes help stakeholders visualize the finished product accurately.
Prototypes shine when they allow users to engage with core functionalities. They should enable meaningful interaction with key features, whether partially or entirely functional. Clearly outlining what's operational and what's not ensures that testing remains focused and purposeful.
Flexibility is a hallmark of a good prototype. It should accommodate quick changes to address feedback, explore alternative solutions, or fix issues without excessive effort. This adaptability is vital for refining the design iteratively and effectively.
While prototypes must be detailed, overcomplicating them can detract from their purpose. A good prototype strikes the right balance by providing enough depth to be informative without overwhelming users with unnecessary complexity.
Prototyping is a valuable tool that enhances creativity, efficiency, and user satisfaction. Testing ideas early helps identify and fix potential issues before full-scale development. Adopting best practices, such as clear goals, user involvement, and iterative improvements, ensures the process delivers maximum benefits.
From simple sketches to advanced models, prototypes provide a roadmap for success, minimizing risks and optimizing resources. Start incorporating prototyping into your workflow today to create better products and experiences that meet user expectations.
Prototyping allows teams to test ideas and resolve issues before development. This reduces the risk of costly changes or redesigns later in the project, saving time and resources.
Popular tools for digital prototyping include Figma, Adobe XD, Sketch, and InVision. These tools allow designers to create interactive and visually appealing prototypes with ease.
The choice between low and high fidelity depends on the project's stage and purpose. Early-stage concepts often use low-fidelity sketches, while high-fidelity prototypes are ideal for detailed testing and stakeholder presentations.
Collaboration ensures that input from designers, developers, and stakeholders is incorporated. It leads to a more refined and user-centered prototype, aligning the project with shared goals and expectations.
User feedback helps identify pain points, usability issues, and areas for improvement. It ensures the final product meets user needs and expectations, making it more effective and user-friendly.


An Experience Design Agency focusing on building functional, simple, human-centered digital products for future.